- Getting started
- Best practices
- Tenant
- About the Tenant Context
- Searching for Resources in a Tenant
- Managing Robots
- Connecting Robots to Orchestrator
- Storing Robot Credentials in CyberArk
- Storing Unattended Robot Passwords in Azure Key Vault (read only)
- Storing Unattended Robot Credentials in HashiCorp Vault (read only)
- Storing Unattended Robot Credentials in AWS Secrets Manager (read only)
- Deleting Disconnected and Unresponsive Unattended Sessions
- Robot Authentication
- Robot Authentication With Client Credentials
- SmartCard Authentication
- Audit
- Settings - Tenant Level
- Resource Catalog Service
- Folders Context
- Automations
- Processes
- Jobs
- Triggers
- Logs
- Monitoring
- Queues
- Assets
- Storage Buckets
- Orchestrator testing
- Other Configurations
- Integrations
- Classic Robots
- Host administration
- Organization administration
- Troubleshooting
Orchestrator user guide
By Manually Selecting Non-working Days
By Uploading .csv Files
Enables you to upload a series of dates into a selected calendar, directly from a .csv file. Please note that the file must be populated beforehand using a predefined format so that the upload operation is successful. The new dates from your uploaded file overwrite any dates already contained in the calendar.
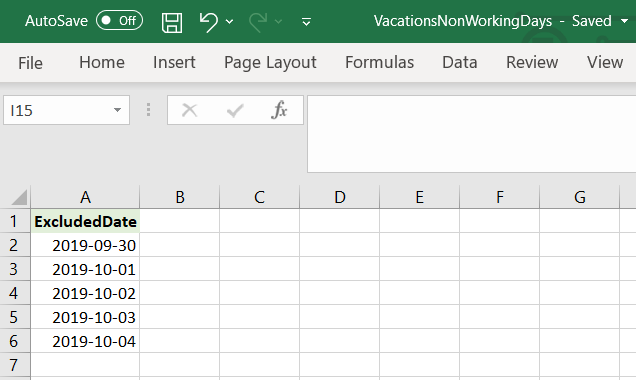
ExcludedDate column header. All the non-working days must be within that column, written in the YYYY-MM-DD, YYYY/MM/DD or YYYY MM DD format.
See the Example section below for more information.
Option 1
- On the selected calendar click Upload csv.
- Navigate to the desired .csv file, select it and click Open. Orchestrator parses the file to confirm it meets formatting rules (see the example section below).
- Click Yes in the confirmation dialog to overwrite the dates already contained in the calendar with the new dates from your uploaded file.
- Click Save to save the modified calendar.
Option 2
- Drag & Drop the desired
.file over the selected calendar's top part. Orchestrator parses the file to confirm it meets formatting rules (see the example section below). - Click Yes in the confirmation dialog to overwrite the dates already contained in the calendar with the new dates from your uploaded file.
- Click Save to save the modified calendar.
Example
Let's say you upload into a calendar the content of the following .csv file. An easy way to create such a file is to populate the data into an excel file and save it as a .csv file:
Or you can download a .csv file with all the pre-filled column headers and customize it to your needs.
Notice that this file contains a predefined column header, ExcludedDate. Enter all your non-working days in that column, using YYYY-MM-DD,YYYY/MM/DD or YYYY MM DD format.
- Select a calendar in the Non-Working Days tab on the Settings page.
- Modify the name of the calendar.
- Click Save to save the changed name.