- Getting started
- Notifications
- Licensing
- Troubleshooting
- Connector Builder
- About Connector Builder
- Building your first connector
- Building your connector from an API definition
- Configuring the authentication
- Using variables in Connector Builder
- Activity designer
- Creating a trigger
- Getting started
- Example A: Build a connector from a blank canvas with Personal Access Token authentication
- Example B: Build a connector from a blank canvas with API key authentication
- Example C: Build a connector from an API specification with OAuth 2.0 Client credentials authentication
- Act! 365
- ActiveCampaign
- Active Directory - Preview
- Adobe Acrobat Sign
- Adobe PDF Services
- Amazon Bedrock
- Amazon Connect
- Amazon Polly
- Amazon SES
- Amazon Transcribe
- Amazon Web Services
- Anthropic Claude
- Asana
- AWeber
- Azure AI Document Intelligence
- Azure Maps
- BambooHR
- Box
- Brevo
- Calendly
- Campaign Monitor
- Cisco Webex Teams
- Citrix Hypervisor
- Citrix ShareFile
- Clearbit
- Confluence Cloud
- Constant Contact
- Coupa
- CrewAI – Preview
- Customer.io
- Database Hub - Preview
- Databricks Agent
- Datadog
- DeepSeek
- Deputy
- Discord - Preview
- DocuSign
- Drip
- Dropbox
- Dropbox Business
- Egnyte
- Eventbrite
- Exchangerates
- Exchange Server - Preview
- Expensify
- Facebook
- Freshbooks
- Freshdesk
- Freshsales
- Freshservice
- GetResponse
- GitHub
- Gmail
- Google Cloud Platform
- Google Docs
- Google Drive
- Google Forms - Preview
- Google Maps
- Google Sheets
- Google Speech-to-Text
- Google Text-to-Speech
- Google Tasks - Preview
- Google Vertex
- Google Vision
- Google Workspace
- GoToWebinar
- Greenhouse
- Hootsuite
- HTTP
- HTTP Webhook
- Hubspot CRM
- HubSpot Marketing
- HyperV - Preview
- Icertis
- iContact
- Insightly CRM
- Intercom
- Jina.ai
- Jira
- Keap
- Klaviyo
- LinkedIn
- Mail
- Mailchimp
- Mailgun
- Mailjet
- MailerLite
- Marketo
- Microsoft 365
- Microsoft Azure
- Microsoft Azure Active Directory
- Microsoft Azure AI Foundry
- Microsoft Azure OpenAI
- Microsoft Dynamics 365 CRM
- Microsoft OneDrive & Sharepoint
- Microsoft Outlook 365
- Microsoft Power Automate – Preview
- Microsoft Sentiment
- Microsoft Teams
- Microsoft Translator
- Microsoft Vision
- Miro
- NetIQ eDirectory
- Okta
- OpenAI
- OpenAI V1 Compliant LLM
- Oracle Eloqua
- Oracle NetSuite
- PagerDuty
- PayPal
- PDFMonkey
- Perplexity
- Pinecone
- Pipedrive
- QuickBooksOnline
- Quip
- Salesforce
- Salesforce AgentForce & Flows – Preview
- Salesforce Marketing Cloud
- SAP BAPI
- SAP Cloud for Customer
- SAP Concur
- SAP OData
- SendGrid
- ServiceNow
- Shopify
- Slack
- SmartRecruiters
- Smartsheet
- Snowflake
- Snowflake Cortex
- Stripe
- Sugar Enterprise
- Sugar Professional
- Sugar Sell
- Sugar Serve
- System Center - Preview
- TangoCard
- Todoist
- Trello
- Twilio
- UiPath Apps - Preview
- UiPath Data Fabric – Preview
- UiPath GenAI Activities
- UiPath Orchestrator
- X (formerly Twitter)
- Xero
- watsonx.ai
- WhatsApp Business
- WooCommerce
- Workable
- Workday
- Workday REST
- VMware ESXi vSphere
- YouTube
- Zendesk
- Zoho Campaigns
- Zoho Desk
- Zoho Mail
- Zoom
- ZoomInfo

Integration Service user guide
Example A: Build a connector from a blank canvas with Personal Access Token authentication
In the following example, we build a connector for OpenAI DALL-E from a blank canvas, using Personal Access Token authentication.
Create the new connector
This example shows how to use OpenAI model DALL-E to generate an image based on a text prompt.
-
Navigate to Integration Service.
-
From the connector catalog page, select Build your connector or Connector Builder.
-
Next, select Create New Connector.
-
Select Start from blank.
-
Add a Name for your connector and, optionally, a description and icon.
-
Select Create.

Configure the API resource
How it works
First, let's see how generating an image through API works.
With DALL-E, you supply a prompt, the model automatically rewrites it for safety reasons, and adds more details. Detailed
prompts generally result in higher quality output. Then, the model outputs the generated image either through a link ("responseformat": "URL") or a Base64 string ("responseformat": "b64_json"). The URL is the default value, per the API specification. For more details on the API parameters, refer to API Reference - OpenAI API.
Here is an example cURL to generate an image using this API:
cURL https://api.openai.com/v1/images/generations \

   -H "Content-Type: application/json" \

   -H "Authorization: Bearer $OPENAIAPIKEY" \

   -d '{

      "model": "dall-e-3",

      "prompt": "A robot automating human task in computer",

      "n": 1,

      "size": "1024x1024"

   }'
cURL https://api.openai.com/v1/images/generations \

   -H "Content-Type: application/json" \

   -H "Authorization: Bearer $OPENAIAPIKEY" \

   -d '{

      "model": "dall-e-3",

      "prompt": "A robot automating human task in computer",

      "n": 1,

      "size": "1024x1024"

   }'
Set up the authentication mechanism and resources
There are three key things you need to be aware of in building the first API resource for your connector:
- Base URL
- Authentication type
- API Operation and Resource (sometimes called routes)
Dissecting the previous cURL, you can observe the following components:
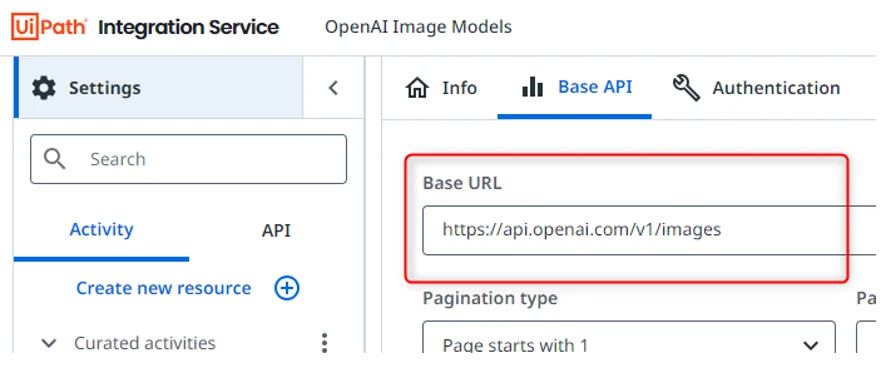
- Base URL:
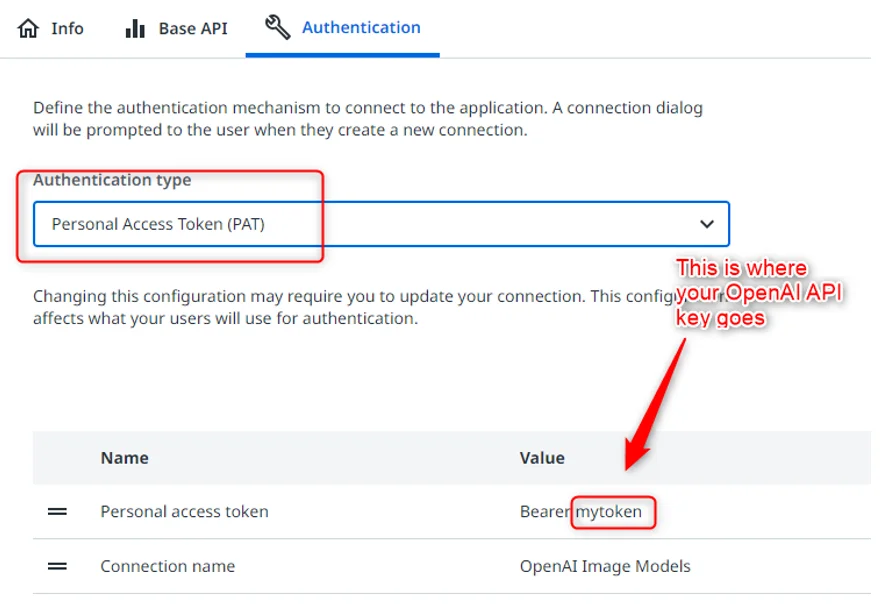
https://api.openai.com/images - Authentication type:
Authorization: Bearer $OPENAIAPIKEY - API Operation and Resource:
post /generations
The Base URL provides the location or endpoint of the API resource for which the calls are to be made.
The Authentication type tells the connector how the user is authenticated before being permitted to utilize the API resource. In this example, we are using Personal Access Token as a Bearer Token in the Authorization header, using the OpenAI API key.
The API routes – the operation and resource – provide the path to a specific resource available on the API, for example /generations. The resource is appended to the base URL, in which that resource can be fetched/listed (GET), added to/inserted (POST ), updated/upserted (PATCH/PUT), or deleted (DELETE).

You can add as many API resources and operations as you want, based on the activities that you need for your workflow. For
example, you can generate images (POST /generations), list all the generated images with GET /generations (if the GET operation is available for the resource), or edit an existing image (POST /edits).
Connector Builder currently supports application/json as payload Content type and not form data. The Image Edit functionality of the DALL-E model may not be possible with Connector Builder at the moment.
Test the API resource output
Before you publish and use the connector in your workflow, test it first.
-
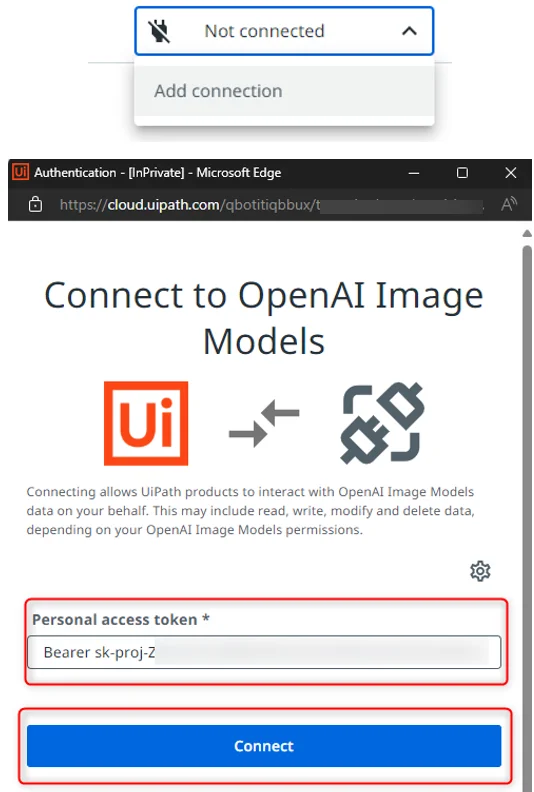
Make sure your connector is in Connected status. Select Add connection in the upper-right corner of the window and set up a connection through the selected authentication mechanism.
-
Navigate to your first API resource and select Send Request.
-
Provide the body or payload for the API, as indicated in the following cURL script:
{ "model": "dall-e-3", "prompt": "A robot automating human task in computer", "n": 1, "size": "1024x1024" }{ "model": "dall-e-3", "prompt": "A robot automating human task in computer", "n": 1, "size": "1024x1024" }{ "model": "dall-e-3", "prompt": "A robot automating human task in computer", "n": 1, "size": "1024x1024" }{ "model": "dall-e-3", "prompt": "A robot automating human task in computer", "n": 1, "size": "1024x1024" }


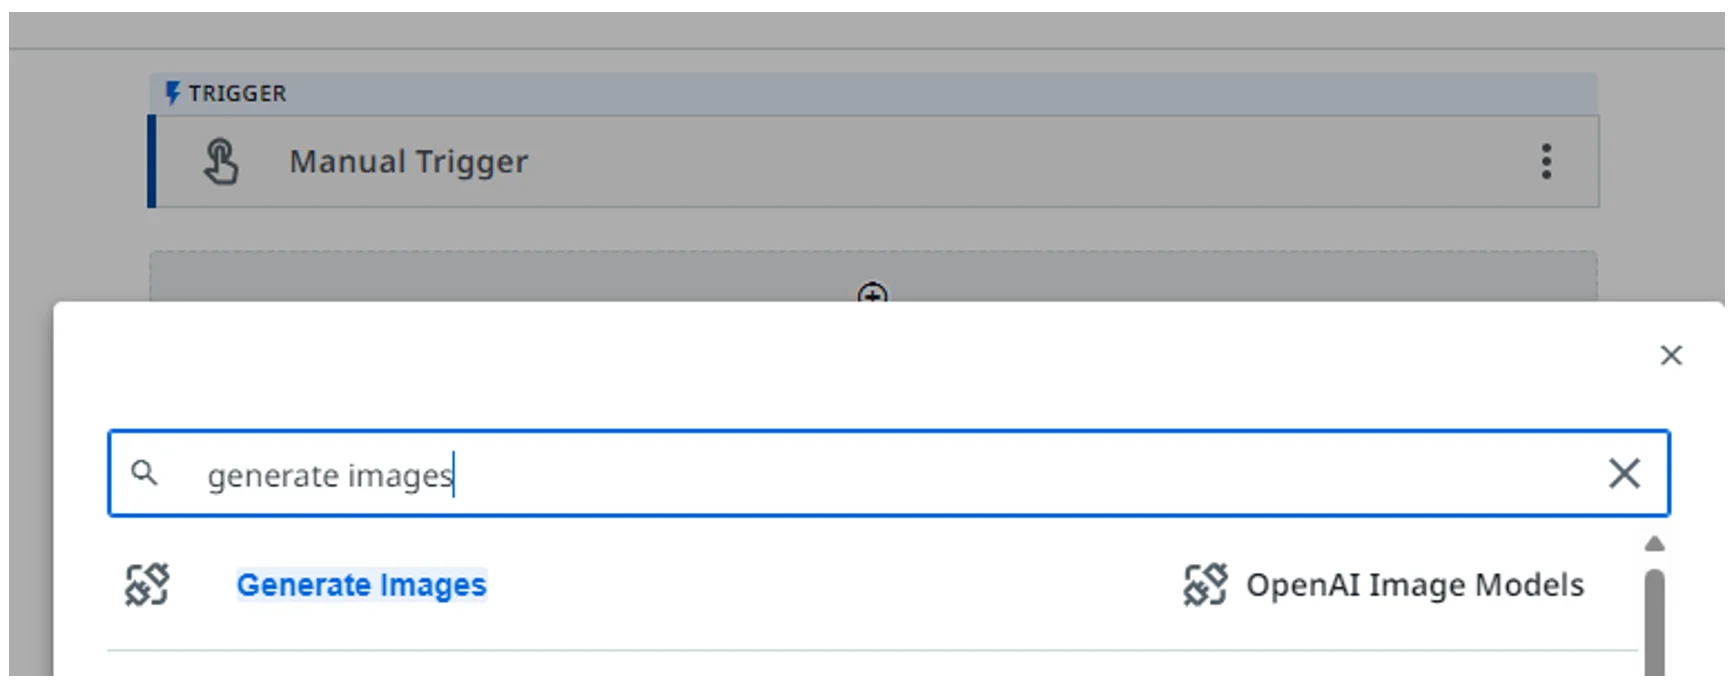
Configure the activities
Now that you are able to test your connector, you can configure the design of the workflow component for this specific activity, through Activity designer.
Activity Designer helps curate input and output fields that you want to expose to users for this activity. This represents the "look and feel" when the API connector is used in UiPath Studio or Studio Web. For more information, refer to Activity designer.
You can change the display name of fields, mark input fields as required or not, whether they are a primary or secondary parameter etc. The input fields are auto-generated from the request fields or body once you perform a Send Request action.

As for the response or output fields, you can update the response root key so you can curate specific output attributes from
the API response, like revised_prompt or URL, as captured in the following image.


Publish the connector
Next, publish your connector in your tenant of choice. For more information, refer to Publishing your connector. Then you can use it in your Studio Desktop or Studio Web workflows.
Studio Web
-
In Studio Web, create a new project. In the activity search panel, search for your custom activity and add it to your workflow.
-
From the custom activity, create the connection, then start configuring the parameters.
-
Test your workflow.
Studio Desktop
You need Studio Desktop 2023.10 or newer.
-
Make sure Studio Desktop is connected to the same tenant where the connector was published.
-
In the Activities panel, make sure the Available filter is enabled.
-
In the Activities panel, under the Available section, search for your connector name. Drag and drop any activity to your workflow. This installs the unified
UiPath.IntegrationService.Activitiespackage, containing all Integration Service-based activities, including your custom ones. -
Alternatively, you can use the Manage Packages panel to search for and install the
UiPath.IntegrationService.Activitiespackage.