- Getting started
- Notifications
- Licensing
- Troubleshooting
- Connector Builder
- About Connector Builder
- Building your first connector
- Building your connector from an API definition
- Configuring the authentication
- Using variables in Connector Builder
- Activity designer
- Creating a trigger
- Getting started
- Example A: Build a connector from a blank canvas with Personal Access Token authentication
- Example B: Build a connector from a blank canvas with API key authentication
- Example C: Build a connector from an API specification with OAuth 2.0 Client credentials authentication
- Act! 365
- ActiveCampaign
- Active Directory - Preview
- Adobe Acrobat Sign
- Adobe PDF Services
- Amazon Bedrock
- Amazon Connect
- Amazon Polly
- Amazon SES
- Amazon Transcribe
- Amazon Web Services
- Anthropic Claude
- Asana
- AWeber
- Azure AI Document Intelligence
- Azure Maps
- BambooHR
- Box
- Brevo
- Calendly
- Campaign Monitor
- Cisco Webex Teams
- Citrix Hypervisor
- Citrix ShareFile
- Clearbit
- Confluence Cloud
- Constant Contact
- Coupa
- CrewAI – Preview
- Customer.io
- Database Hub - Preview
- Databricks Agent
- Datadog
- DeepSeek
- Deputy
- Discord - Preview
- DocuSign
- Drip
- Dropbox
- Dropbox Business
- Egnyte
- Eventbrite
- Exchangerates
- Exchange Server - Preview
- Expensify
- Facebook
- Freshbooks
- Freshdesk
- Freshsales
- Freshservice
- GetResponse
- GitHub
- Gmail
- Google Cloud Platform
- Google Docs
- Google Drive
- Google Forms - Preview
- Google Maps
- Google Sheets
- Google Speech-to-Text
- Google Text-to-Speech
- Google Tasks - Preview
- Google Vertex
- Google Vision
- Google Workspace
- GoToWebinar
- Greenhouse
- Hootsuite
- HTTP
- HTTP Webhook
- Hubspot CRM
- HubSpot Marketing
- HyperV - Preview
- Icertis
- iContact
- Insightly CRM
- Intercom
- Jina.ai
- Jira
- Keap
- Klaviyo
- LinkedIn
- Mail
- Mailchimp
- Mailgun
- Mailjet
- MailerLite
- Marketo
- Microsoft 365
- Microsoft Azure
- Microsoft Azure Active Directory
- Microsoft Azure AI Foundry
- Microsoft Azure OpenAI
- Microsoft Dynamics 365 CRM
- Microsoft OneDrive & Sharepoint
- Microsoft Outlook 365
- Microsoft Power Automate – Preview
- Microsoft Sentiment
- Microsoft Teams
- Microsoft Translator
- Microsoft Vision
- Miro
- NetIQ eDirectory
- Okta
- OpenAI
- OpenAI V1 Compliant LLM
- Oracle Eloqua
- Oracle NetSuite
- PagerDuty
- PayPal
- PDFMonkey
- Perplexity
- Pinecone
- Pipedrive
- QuickBooksOnline
- Quip
- Salesforce
- Salesforce AgentForce & Flows – Preview
- Salesforce Marketing Cloud
- SAP BAPI
- SAP Cloud for Customer
- SAP Concur
- SAP OData
- SendGrid
- ServiceNow
- Shopify
- Slack
- SmartRecruiters
- Smartsheet
- Snowflake
- Snowflake Cortex
- Stripe
- Sugar Enterprise
- Sugar Professional
- Sugar Sell
- Sugar Serve
- System Center - Preview
- TangoCard
- Todoist
- Trello
- Twilio
- UiPath Apps - Preview
- UiPath Data Fabric – Preview
- UiPath GenAI Activities
- UiPath Orchestrator
- X (formerly Twitter)
- Xero
- watsonx.ai
- WhatsApp Business
- WooCommerce
- Workable
- Workday
- Workday REST
- VMware ESXi vSphere
- YouTube
- Zendesk
- Zoho Campaigns
- Zoho Desk
- Zoho Mail
- Zoom
- ZoomInfo

Integration Service user guide
Example C: Build a connector from an API specification with OAuth 2.0 Client credentials authentication
In the following example, we build a connector for USPS from existing API documentation, using OAuth 2.0 Client credentials authentication.
Importing from an API documentation
With this approach, you can easily import as many resources as included in the API reference. Connector Builder allows you to upload existing API documentation in JSON or YAML format, or through Swagger or Postman.
In the following example we are building a connector for USPS Address Validation/Normalization API. Unlike for Examples A and B, now we:
- Download the API reference from the USPS website.
- Use OAuth 2.0 Client Credentials authentication.
Download the API reference
- Sign up on USPS Developer Portal (
https://developer.usps.com/) and navigate to the API Catalog. - Download the API reference you want to build the connector for. For example: addresses 3.0.

Import the API reference into Connector Builder
-
Upload the API reference into Connector Builder.

-
After you select Create, you can see all the resources available in the definition you uploaded: GET/addresses, GET/city-state, GET/zipcode.

Configure the authentication
Next, you must configure the authentication. To use OAuth 2.0 Client Credentials you must create an OAuth 2.0 application in the USPS Developer Portal. For details, refer to the Getting started guide.
-
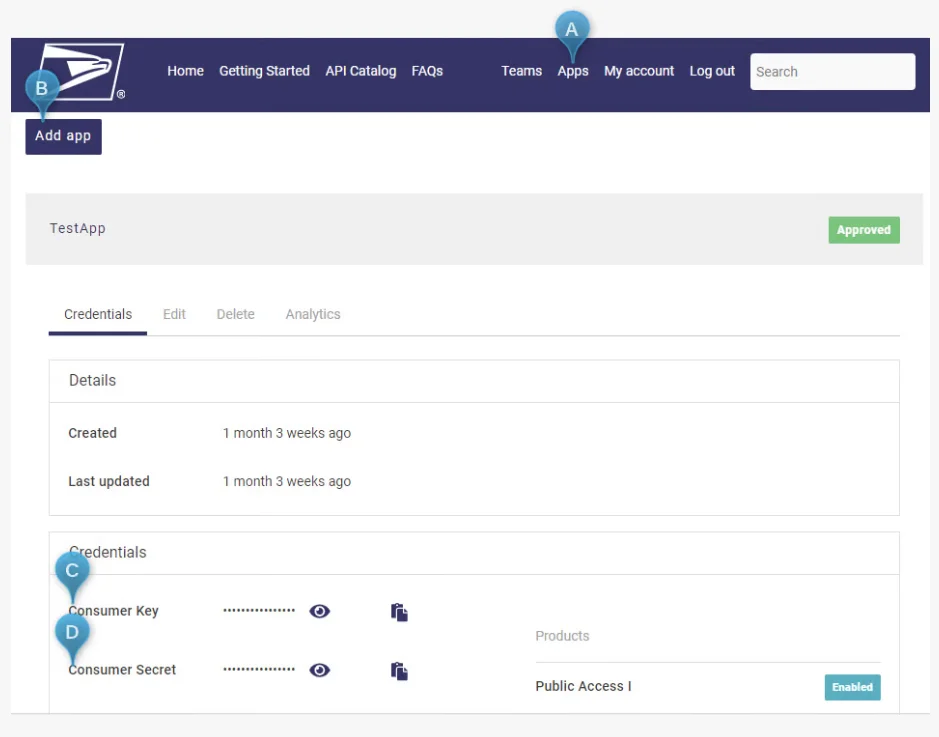
In the USPS Developer Portal, navigate to Apps and select Add app.
-
Configure the application. Once you create it, copy the Consumer Key and Consumer Secret credentials. These correspond to the Client ID and Client Secret fields.

-
Back in Connector Builder, set the Authentication type to OAuth 2.0 Client Credentials.
-
Configure the following credentials:
- Client ID: <your Consumer Key>
- Client Secret: <your Consumer Secret>
- Scope: addresses
- Token URL: https://api.usps.com/oauth2/v3/token
-
Test your connector. Select Send Request to test the created API resources and provide the input parameters as follows:
