- 入门指南
- 通知
- 许可
- 故障排除
- 连接器生成器
- Act! 365
- ActiveCampaign
- Active Directory - 预览版
- Adobe Acrobat Sign
- Adobe PDF 服务
- Amazon Bedrock
- Amazon Connect
- Amazon Polly
- 亚马逊 SES
- Amazon Transcribe
- Amazon Web Services
- Anthropic Claude
- Asana
- AWeber
- Azure AI 文档智能
- Azure Maps
- BambooHR
- Box
- Brevo
- Calendly
- Campaign Monitor
- Cisco Webex Teams
- Citrix Hypervisor
- Citrix ShareFile
- 清除位
- Confluence Cloud
- Constant Contact
- Coupa
- CrewAI – 预览版
- Customer.io
- 数据库 Hub - 预览版
- Databricks智能体
- Datadog
- 深度查找
- Deputy
- Discord - 预览
- DocuSign
- 水滴
- Dropbox
- Dropbox Business
- Egnyte
- Eventbrite
- 汇率
- Exchange Server - 预览
- Expensify
- Facebook
- Freshbooks
- Freshdesk
- Freshsales
- Freshservice
- 获取响应
- GitHub
- Gmail
- 谷歌云平台
- Google 文档
- Google 云端硬盘
- Google 表单 - 预览
- Google Maps
- Google 表格
- Google 语音转文本
- Google 文本转语音
- Google Tasks - 预览
- Google Vertex
- Google Vision
- Google Workspace
- GoToWebinar
- Greenhouse
- Hootsuite
- HTTP
- HTTP Webhook - 预览
- HubSpot CRM
- HubSpot Marketing
- HyperV - 预览
- Icertis
- iContact
- Insightly CRM
- Intercom
- Jina.ai
- Jira
- Keap
- Klaviyo
- LinkedIn
- 邮件
- Mailchimp
- Mailgun
- Mailjet
- MailerLite
- Marketo
- Microsoft 365
- Microsoft Azure
- Microsoft Azure Active Directory
- Microsoft Azure AI Foundry
- Microsoft Azure OpenAI
- Microsoft Dynamics 365 CRM
- Microsoft OneDrive 和 SharePoint
- Microsoft Outlook 365
- Microsoft Power Automate – 预览版
- Microsoft Sentiment
- Microsoft Teams
- Microsoft Translator
- Microsoft Vision
- Miro
- NetIQ eDirectory
- 奥克塔
- OpenAI
- 符合 OpenAI V1 的 LLM
- Oracle Eloqua
- Oracle NetSuite
- PagerDuty
- 贝宝
- PDFMonkey
- Perplexity
- Pinecone
- Pipedrive
- QuickBooksOnline
- Quip
- Salesforce
- Salesforce 代理强制和流程 – 预览
- Salesforce Marketing Cloud
- SAP BAPI
- SAP Cloud for Customer
- SAP Concur
- SAP OData
- SendGrid
- ServiceNow
- Shopify
- Slack
- SmartRecruiters
- Smartsheet
- Snowflake
- Snowflake Cortex
- Stripe
- Sugar Enterprise
- Sugar Professional
- Sugar Sell
- Sugar Serve
- System Center - 预览
- 探戈卡
- Todoist
- Trello
- Twilio
- UiPath Apps - Preview
- UiPath Data Fabric – 预览
- UiPath 生成式 AI 活动
- UiPath Orchestrator
- X(以前称为 Twitter)
- Xero
- WatsonX.ai
- WhatsApp Business
- WOO COMMERCE
- 可行
- Workday
- Workday REST
- VMware ESXi vSphere
- YouTube
- Zendesk
- Zoho Campaigns
- Zoho Desk
- Zoho Mail
- 缩放
- Zoom 信息

Integration Service 用户指南
连接
关于连接
连接有助于在单个用户和外部应用程序之间建立任务。 一旦用户向 API 提供程序进行身份验证,就会创建连接。
创建连接
- 在左侧栏上,选择“Integration Service” 。Integration Service 窗口包含三个单独的选项卡: “连接器” 、 “连接”和(“触发器”) 。默认情况下,选择“连接器”选项卡。
- 在“我的文件夹”部分中,您可以选择是要在个人工作区还是在共享文件夹中工作,对这些文件夹,有权访问此文件夹的所有用户都可以使用创建的连接。
- 选择所需的连接器,以创建新连接或更新现有连接。
- 选择“连接到”<Connector name> 。根据您选择的连接器,系统将请求连接所需的特定凭据。
- 选择连接应所在的文件夹或子文件夹。您可以在个人工作区或共享文件夹中工作,其中有权访问此文件夹的所有用户都可以使用已创建的连接。
要成功创建连接,您必须为 Integration Service 配置 IP 地址允许列表。有关详细信息,请参阅《Automation Cloud 管理员指南》中的“配置防火墙” 。
共享连接
在共享文件夹中创建连接后,所有有权访问该文件夹的用户都可以在其自动化工作流中使用该连接。 所有有权访问该连接的用户均可编辑该连接。
所有 Integration Service 连接器都支持运行时连接共享和配置。有关在运行时配置连接的更多信息,请参阅《Orchestrator 用户指南》 。
修改连接
- 从左侧栏中,选择“Integration Service” 。Integration Service 窗口包含三个单独的选项卡: “连接器” 、 “连接”和“触发器” 。
- 选择要在其中修改连接的文件夹。注意:在步骤 4 之后,也可以选择要在其中创建连接的文件夹。
- Go to the Connections tab, where the list of created connections is displayed.
- 选择与所需连接相对应的“更多”按钮,进行修改。您可以执行以下操作:
- 删除连接。
- 将其设置为默认值(仅当您为同一应用程序建立了多个连接时,此选项才可用。
- 检查连接以验证其状态。
重命名连接
要重命名连接,您必须:
- Access the Connections tab.
- 在左侧菜单上,选择“Integration Service”。“Integration Service” 窗口包含“连接器” 、 “连接”和“触发器”单独的选项卡,以及一个显示文件夹的左侧导航窗口。
- 选择要在其中修改连接的文件夹。注意:可以在第 4 步之后选择文件夹。
- Go to the Connections tab, where the list of created connections is displayed.
- 将鼠标光标悬停在要修改的连接名称上。系统将显示“编辑”按钮。注意:或者,您可以从列表中选择连接以访问详细视图。“编辑”按钮位于连接名称的右侧。
- 选择“编辑”按钮,您可以为连接选择新名称。
管理连接
您可以直接通过 UiPath Assistant 管理 Integration Service 连接。要了解更多信息,请参阅“UiPath Assistant 中的连接” 。
选择“在浏览器中配置” ,以在 Studio Web 中打开“连接”页面。要了解更多信息,请参阅《Studio Web 用户指南》中的“管理连接” 。
Automation Cloud 公共部门用户可以在 UiPath Assistant 中查看连接,但无法管理连接。相反,他们可以使用 Orchestrator 中的“包要求”选项卡配置和管理 Integration Service 连接。
选择身份验证类型
Integration Service 中的某些连接器支持多种身份验证方法。您可以在启动连接之前选择首选方法。
-
在 Integration Service 中,从“连接器”列表中选择一个受支持的连接器。
-
选择“连接到” <connector name>,以转到连接设置页面。
-
使用存储连接的文件夹下拉列表选择适当的文件夹(例如,我的工作区)。
-
使用“身份验证类型”下拉列表从可用选项中进行选择,例如:
- OAuth 2.0 授权代码
- OAuth 2.0 密码
- 自带 OAuth 2.0 应用程序
- 个人访问令牌 (PAT)
注意:可用选项可能因连接器而异。
-
输入所选身份验证类型所需的凭据,然后选择“连接”以建立连接。
自带 OAuth 2.0 应用程序
身份验证体验使您能够对支持 OAuth 2.0 授权代码的连接器使用“自带 OAuth 2.0 应用程序(BYOA)”选项。这使您可以在连接之前进行身份验证时选择私人应用程序。
要使用“自带 OAuth 2.0 应用程序”方法创建连接,您需要以下凭据:
- 客户端 ID
- 客户端密码
如果您的组织使用 BYOA,则可以通过 Automation Ops 中的 Integration Service 监管策略为这些凭据设置默认值。有关详细信息,请参阅“Integration Service 策略设置” 。
当您与第三方创建私有 OAuth 应用程序时,请按照特定的第三方文档进行设置。确保将应用程序的重定向 URI(或回调 URL)设置为https://cloud.uipath.com/provisioning_/callback 。
要创建与私有 OAuth 2.0 应用程序的连接,请执行以下步骤:
- 转到“Integration Service” 。从“连接器”列表中,选择一个受支持的连接器。
- 选择“连接到”按钮。
- 您现在已重定向到连接页面。
- 选择“自带 OAuth 2.0 应用程序”
- 输入您的客户端 ID 和客户端密码,然后选择“连接” 。
对于 OAuth 2.0 应用程序连接,我们会加密和存储身份验证令牌,但不会使用它来访问任何客户端数据。
解决方案中的连接
您可以将连接和事件触发器作为解决方案包的一部分进行管理。请参阅解决方案管理概述,了解解决方案包是什么、它们的工作方式以及如何创建、管理和部署它们。
创建解决方案包时,连接及其关联的事件触发器在“组件”面板中可用。您可以编辑以下属性:(可选) 、(可选)、 (可选) 、、 (可选)和。对于事件触发器,您可以执行与Orchestrator中相同的配置步骤。

除非您已锁定以进行编辑,否则您也可以在部署时编辑这些字段。
构建并发布解决方案后,即可在解决方案的“组件”面板中使用连接。现在可以部署创建解决方案包时选择的所有连接。
除非还连接了事件触发器,否则解决方案管理不会显示流程的连接。此问题可能会影响解决方案部署,需要手动配置连接才能正常操作。
您可以选择将解决方案包部署到 Integration Service 中尚不存在的特定文件夹。 在这种情况下,系统会自动创建文件夹。


连接身份验证类型
作为管理员,您可以在部署期间决定是使用现有连接、创建新连接或允许最终用户选择连接。
解决方案会移动连接及其关联的实体关系(例如连接所属的工作流和流程),但不会传输身份验证凭据。
在部署期间,管理员可以将身份验证类型设置为:
-
由用户配置: 不会根据现有连接创建或使用连接。在运行时部署解决方案后,用户应配置连接。请参阅 Orchestrator 文档中的配置连接。
-
部署完成后进行身份验证:将创建一个新连接,该连接在部署后要求进行身份验证。在完成身份验证步骤之前,连接保持非活动状态。
- 在身份验证完成之前,用户名显示为
System。 身份验证成功后,系统会更新用户名以显示身份验证者的凭据。
- 在身份验证完成之前,用户名显示为
您还可以选择链接组件。当您选择“链接到现有”时,将会弹出一个窗口,显示可供部署解决方案包的用户访问的所有连接。您可以选择任何现有连接作为解决方案包的一部分。
如果为解决方案包中包含的连接器选择现有连接,并且在部署过程中选择了一个新文件夹,则在 Integration Service 中创建该文件夹,其中没有连接。如果修改了首选项或添加了新连接,请使用此文件夹。
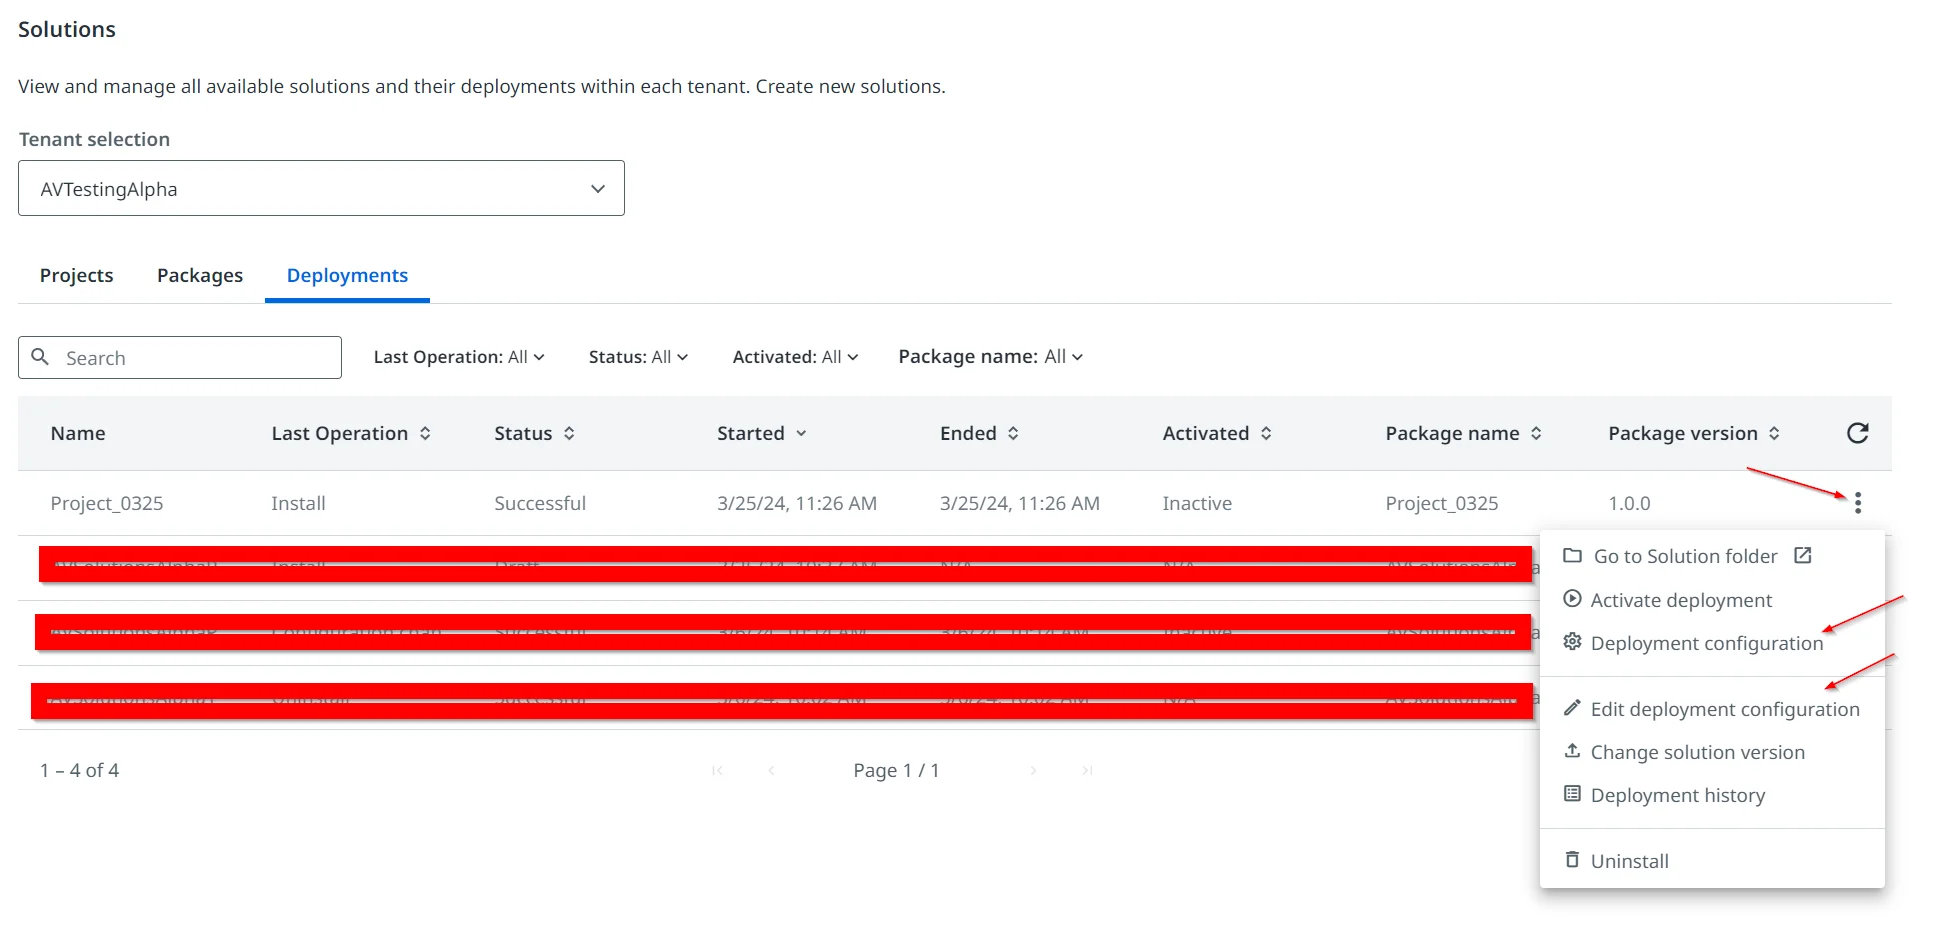
使用以下方法编辑配置时, “链接到现有” 选项不可用:部署配置或编辑部署配置。要在部署后链接组件或编辑身份验证类型,必须升级解决方案包。这需要编辑解决方案并再次部署新版本。
系统不会删除通过解决方案在任何文件夹中创建的连接,即使升级工作流以使用不同的连接也是如此。这可确保依赖这些连接的流程和自动化不受升级的影响。