- Release Notes
- Getting Started
- Setup and Configuration
- Automation Projects
- Dependencies
- Types of Workflows
- File Comparison
- Automation Best Practices
- Source Control Integration
- Debugging
- The Diagnostic Tool
- Workflow Analyzer
- About Workflow Analyzer
- ST-NMG-001 - Variables Naming Convention
- ST-NMG-002 - Arguments Naming Convention
- ST-NMG-004 - Display Name Duplication
- ST-NMG-005 - Variable Overrides Variable
- ST-NMG-006 - Variable Overrides Argument
- ST-NMG-008 - Variable Length Exceeded
- ST-NMG-009 - Prefix Datatable Variables
- ST-NMG-011 - Prefix Datatable Arguments
- ST-NMG-012 - Argument Default Values
- ST-NMG-016 - Argument Length Exceeded
- ST-DBP-002 - High Arguments Count
- ST-DBP-003 - Empty Catch Block
- ST-DBP-007 - Multiple Flowchart Layers
- ST-DBP-020 - Undefined Output Properties
- ST-DBP-021 - Hardcoded Timeout
- ST-DBP-023 - Empty Workflow
- ST-DBP-024 - Persistence Activity Check
- ST-DBP-025 - Variables Serialization Prerequisite
- ST-DBP-026 - Delay Activity Usage
- ST-DBP-027 - Persistence Best Practice
- ST-DBP-028 - Arguments Serialization Prerequisite
- ST-USG-005 - Hardcoded Activity Arguments
- ST-USG-009 - Unused Variables
- ST-USG-010 - Unused Dependencies
- ST-USG-014 - Package Restrictions
- ST-USG-020 - Minimum Log Messages
- ST-USG-024 - Unused Saved for Later
- ST-USG-025 - Saved Value Misuse
- ST-USG-026 - Activity Restrictions
- ST-USG-027 - Required Packages
- ST-USG-028 - Restrict Invoke File Templates
- ST-USG-032 - Required Tags
- ST-USG-034 - Automation Hub URL
- Variables
- Arguments
- Imported Namespaces
- Coded automations
- Trigger-based Attended Automation
- Control Flow
- Object Repository
- Logging
- The ScreenScrapeJavaSupport Tool
- Studio testing
- Extensions
- About extensions
- SetupExtensions tool
- UiPathRemoteRuntime.exe is not running in the remote session
- UiPath Remote Runtime blocks Citrix session from being closed
- UiPath Remote Runtime causes memory leak
- UiPath.UIAutomation.Activities package and UiPath Remote Runtime versions mismatch
- The required UiPath extension is not installed on the remote machine
- Screen resolution settings
- Group Policies
- Cannot communicate with the browser
- Chrome extension is removed automatically
- The extension may have been corrupted
- Check if the extension for Chrome is installed and enabled
- Check if ChromeNativeMessaging.exe is running
- Check if ComSpec variable is defined correctly
- Enable access to file URLs and Incognito mode
- Multiple browser profiles
- Group Policy conflict
- Known issues specific to MV3 extensions
- List of extensions for Chrome
- Chrome Extension on Mac
- Group Policies
- Cannot communicate with the browser
- Edge extension is removed automatically
- The extension may have been corrupted
- Check if the Extension for Microsoft Edge is installed and enabled
- Check if ChromeNativeMessaging.exe is running
- Check if ComSpec variable is defined correctly
- Enable access to file URLs and InPrivate mode
- Multiple browser profiles
- Group Policy conflict
- Known issues specific to MV3 extensions
- List of extensions for Edge
- Extension for VMware Horizon
- SAP Solution Manager plugin
- Excel Add-in
- Troubleshooting

Studio user guide
Sequences
Sequences are the smallest type of project. They are suitable to linear processes as they enable you to go from one activity to another seamlessly, and act as a single block activity.
One of the key features of sequences is that they can be reused time and again, as a standalone automation or as part of a state machine or flowchart.
For example, you can create a sequence to take information from a .pdf file and add it to a spreadsheet, and reuse it in a different setting, while changing just a few properties.
Please take into consideration that whenever you wish to copy a large number of activities from one sequence to another, it is recommended to scroll down to the bottom of the Designer panel beforehand. This is due to a Windows Workflow Foundation limitation.
Sequences do not use connectors.
Example of a Sequence
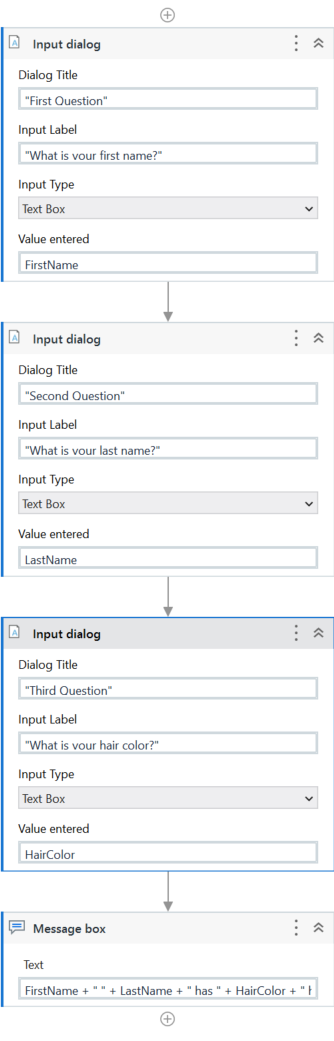
To create a sequence that asks the user for their first and last name, and their hair color, and then displays their answers, do the following:
-
Create a blank process and, on the Design tab, in the File group, select New > Sequence. The New Sequence window is displayed.
Note:You can also add a Sequence activity to the Designer panel to create a new sequence, or simply drag an activity from the Activities panel and Studio automatically adds a parent sequence to it.
-
In the Name field type a name for the automation, such as "First Sequence", and leave the default project location or add a subfolder. Click Create. The Designer panel is updated accordingly.
-
Create three String variables such as
FirstName,LastName, andHairColor, so that you can store data from the user in them. Leave the Default field empty, to indicate that there is no default value.
-
Drag three Input Dialog activities to the Designer panel, one under the other.
-
Select the first Input Dialog. In the Dialog Title field add a custom Title, and in the Input Label field add a Label asking for the first name of the user.
-
In the Value entered field add the
FirstNamevariable. This indicates that this variable is going to be updated with the value added by the user at this point. -
Repeat steps 5 - 6 for the second and third Input Dialog activities to ask the user for his last name and hair color, and store them in the
LastNameandHairColorvariables. -
Add a Message Box activity under the third Input Dialog.
-
Select the Message Box and, in the Properties panel, in the Text field, add the variables and a string to enable you to display all information gathered from the user, such as:
FirstName+ " " +LastName+ " has " +HairColor+ " hair."Note:Remember to add spaces between variables and within strings for an optimal output.
The final project should look as in the following screenshot.
10. On the Design tab, in the File group, click Run. The automation is executed. The final output message should look as in the following screenshot.
