- Overview
- Custom activities
- Migrating activities to .NET 6
- Release notes
- Building workflow analyzer rules
- Building activities project settings
- Creating custom wizards
- Prioritize activities by scope
- UiPath.Activities.Api.Base
- UiPath.Studio.Activities.Api
- UiPath.Studio.Activities.Api.Activities
- UiPath.Studio.Activities.Api.BusyService
- UiPath.Studio.Activities.Api.ExpressionEditor
- UiPath.Studio.Activities.Api.Expressions
- UiPath.Studio.Activities.Api.Licensing
- UiPath.Studio.Activities.Api.Mocking
- UiPath.Studio.Activities.Api.ObjectLibrary
- UiPath.Studio.Activities.Api.PackageBindings
- UiPath.Studio.Activities.Api.ProjectProperties
- UiPath.Studio.Activities.Api.ScopedActivities
- UiPath.Studio.Activities.Api.Settings
- UiPath.Studio.Activities.Api.Wizards
- UiPath.Studio.Activities.Api.Workflow
- UiPath.Studio.Api.Controls
- UiPath.Studio.Api.Telemetry
- UiPath.Studio.Api.Theme
- Robot JavaScript SDK
- Triggers SDK
- Agents SDKs

Developer guide
Testing your activity
After implementing the new activity, test that it works as expected. You can test your activity using one of these methods:
Unit tests
The easiest and fastest way to test the activity code is to write unit tests that isolate the activity code and test individual scenarios.
For example:
[Theory]
[InlineData(1, Operation.Add, 1, 2)]
[InlineData(3, Operation.Subtract, 2, 1)]
[InlineData(3, Operation.Multiply, 2, 6)]
[InlineData(6, Operation.Divide, 2, 3)]
public void Calculator_ReturnsAsExpected(int firstNumber, Operation operation, int secondNumber, int expectedResult)
{
    var calculator = new Calculator()
    {
        SelectedOperation = operation
    };

    var result = calculator.ExecuteInternal(firstNumber, secondNumber);

    Assert.Equal(expectedResult, result);
}
The previous code snippet example creates a new instance of the Calculator class and calls the ExecuteInternal function. There is nothing specific related to activities in this context and basic unit testing principles apply.
To see an example, go to the sample Calculator activity in GitHub.
Workflow tests
Workflow tests are a type of unit tests that rely on the WorkflowInvoker class to place the activity inside a workflow and run it as it would be run by UiPath Robot:
[Fact]
public void Divide_ReturnsAsExpected()
{
    var activity = new Calculator()
    {
        FirstNumber = 4,
        SecondNumber = 2,
        SelectedOperation = Operation.Divide
    };

    var runner = new WorkflowInvoker(activity);
    runner.Extensions.Add(() => workflowRuntimeMock.Object);

    var result = runner.Invoke(TimeSpan.FromSeconds(1)); //the runner will return a dictionary with the values of the OutArguments

    //verify that the result is as expected
    Assert.Equal(2, result["Result"]);

    //verify that we logged a message
    workflowRuntimeMock.Verify(x => x.LogMessage(It.IsAny<LogMessage>()), Times.Once);
}
The previous code snippet create a new instance of the activity, but instead of calling the methods directly on the instance, it places the activity inside a WorkflowInvoker and runs it as part of a workflow. The workflow eventually calls the Execute function on the Calculator class. Notice that this function is protected and you cannot invoke it directly, which is an indirect benefit of using this approach.
This approach is usually used when the activity is dependent on the result of other activities. In this case, you need to create an workflow with multiple activities and let WorkflowInvoker execute it.
UiPath Studio attach to process
Sometimes, it is necessary to test the activity code inside the UiPath.Robot executor. To achieve this, we can use one of two options.
Option 1: System.Diagnostics.Debugger.Launch()
-
Add
Debugger.Launch()where you want the breakpoint to hit your code. -
Build the new package and update the version in your project in UiPath.Studio, and then select Run.
-
The JIT Debugger prompts you to choose a Visual Studio instance to use for debugging.

-
After you select the instance, the JIT will stop the execution at the line where the
Debugger.Launch()was added and from there the normal debug process can begin.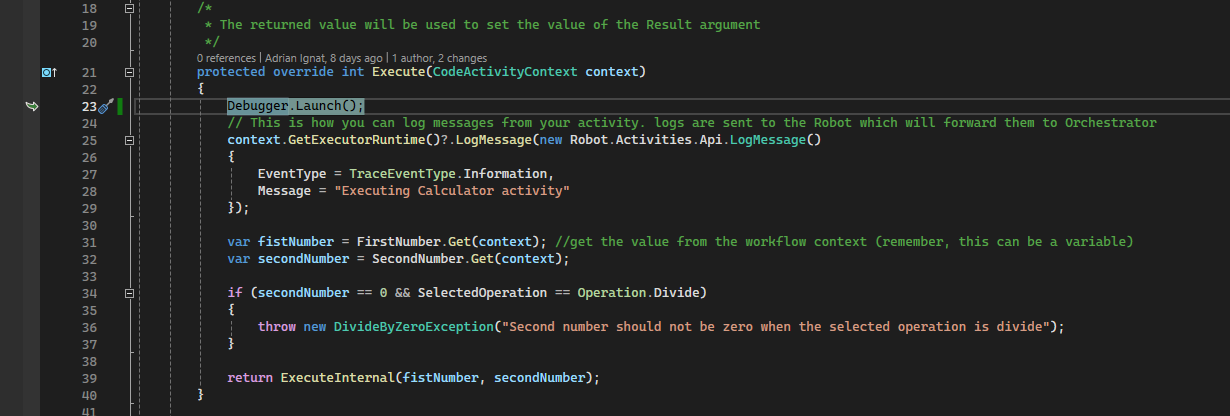
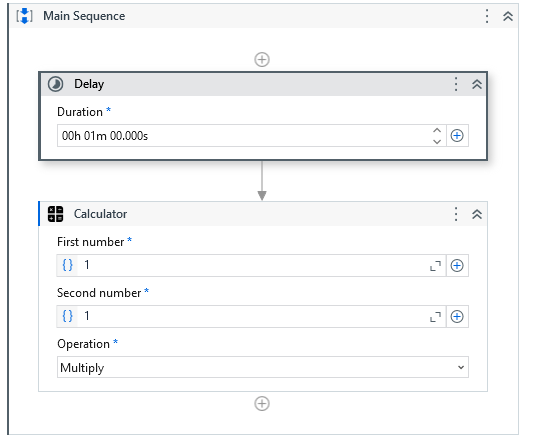
Option 2: Attach to process in Visual Studio
Another option is to delay the execution and then attach Visual Studio to the executor process. While this method requires more overhead, it allows debugging the activity code without modifications.
-
To delay execution, add the Delay activity or, in a Windows project, the Message Box activity.
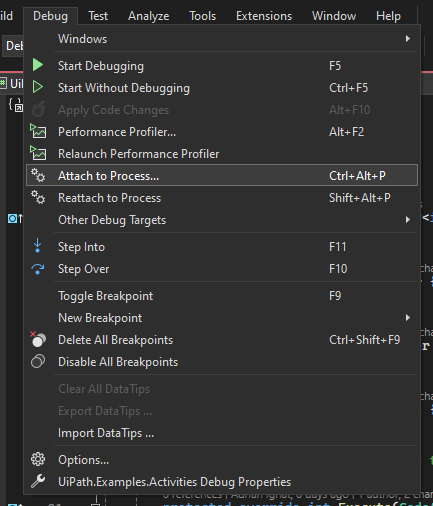
-
Select Run, and then go to Visual Studio and select Debug > Attach to process.
-
Filter the process list by
UiPath.Executor, select all processes, and then click Attach.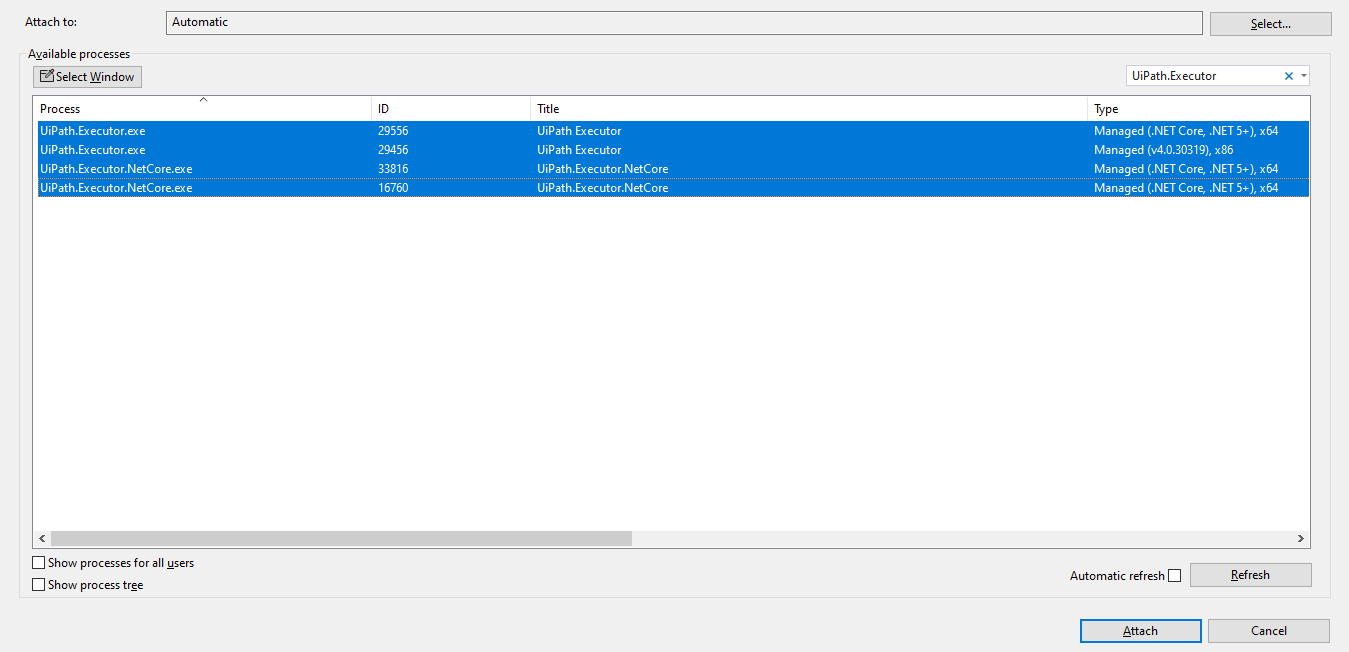
After the delay passes, the process execution is interrupted at the breakpoint you added in your code.